定时任务之Spring Task
本文主要记录学习Spring Task的相关内容。
整理于2020-06-25,最后更新2020-07-18。
一、简述
Spring 3.0以后推出的定时器类调度工具,Spring Task是一个轻量级的quartz。
配置简单,功能较为齐全,在实际项目中经常会用到。
spring task在spring-context的模块中,无需单独引入。
spring task支持xml配置、注解配置、java配置三种方式。本文分别演示3种不同的使用方式。
关于调度的实现方式主要有三种:
(1)Java自带的Api有个Timer类和TimerTask类。
(2)Spring自带的Spring Task调度工具。
(3)Quartz(读阔子)开源框架,功能强大,使用起来稍显复杂。
本文主要记录第二种。其他两种请参考文章底部相关文章。
在开始之前需要说明是一个定时任务的几个组件:
(A)执行的任务类;
(B)触发任务的触发器;
(C)管理任务的任务调度器。
后续配置都是以这三点为中心进行的。
二 Spring Task 使用方式
1、XML方法
XML算是比较传统的方式,需要手工配置
实例:
执行的任务类:
package com.xiaocai.job;
import static java.lang.System.out;
public class UserTask {

    public void doSomething(){
        out.println(" this is  user task ");
    }
}
XML配置:
<bean id="userTask" class="com.xiaocai.job.TaskTest"/>
<task:scheduled-tasks>
        <task:scheduled ref="userTask" method="doSomething" cron="0/5 * * * * ?" />
</task:scheduled-tasks>cron就是执行表达式:0/5 * * * * ?表示每5s执行一次。
参数说明:
scheduled-tasks :调度任务池,可以定义多个任务task,这里指定了一个任务task。
scheduled:可以理解为一个调度实例。其中:ref表示调度的执行任务类,method表示执行任务类中的调度的方法;cron调度执行时间频次表达式,一般顺序是,秒 分 时 日 月 周 年,年通常都会省略。具体的表达式规则,单独参考《定时任务Cron的使用》。
task中用于指定时间频率的方式主要有:
(1)cron 定时表达式模式。
(2)fixed-rate:固定频次执行。单位毫秒,每隔指定时间执行一次
(3)fixed-delay:固定延迟执行。单位毫秒,上次执行任务完成后,间隔指定时间后执行下次任务。
(4)initial-delay:首次执行延迟。单位毫秒,第一次执行任务的时候,延迟指定时间再执行。
spring task 默认使用的是同步模式,即上次任务执行完后,才会执行下次任务。上述时间频率只有在非同步模式下才会完全符合,在同步模式下,实际计算方式为:
fixed-rate :任务的实际执行时间+fixedRate时间之后,执行下次任务
fixed-delay:任务的实际执行时间如果小于fixedDelay,则时间间隔为fixedDelay;如果任务的实际执行时间大于fixedDelay,则上次任务执行完后,立即执行下一次任务。
适用场景
适合的定时任务,比较稳定、不经常变化,操作,日志要求不严格。
2、注解配置
执行任务类:
package com.xiaocai.job;
import static java.lang.System.out;

@Component
public class UserTask {

    @Scheduled(cron = "0 0/5 * * * ?")
    @Async("executor")
    public void doSomethingAnnotation(){
        out.println(" this is  user task for Annotation ");
    }
}
配置方式分有XML和无XML。
(A)有XML的配置:
<!-- 定时任务配置 scheduler 注解方式  -->
<task:executor id="executor" pool-size="5" />
<task:scheduler id="scheduler" pool-size="10" />
<task:annotation-driven executor="executor" scheduler="scheduler" /> <!-- 启用注解 -->
<
参数说明:**
@Async:spring异步模式支持,@Async的值为执行器executor,内部默认为名为SimpleAsyncTaskExecutor的线程池来执行任务。名字需要与xml中配置的一致。如果不要求异步,该注解可略。@Async使用之后,方法仍然是由一个线程来同步执行的。
executor:用于配置线程池。pool-size:线程池数量,可设置范围,也可设置指定值,取值范围[ 1,Integer.MAX_VALUE]。
scheduler:用于配置任务调度器。pool-size:调度池数量,可设置范围,也可设置指定值,取值范围[ 1,Integer.MAX_VALUE]。
啰嗦一句,如果没有使用@Component或@Service注解,则y要配置一下执行任务栏的bean,多个执行任务类可以执行扫描包:
<context:component-scan base-package="com.xiaocai.job" /> (B)无XML配置:
如springboot中使用,直接在启动类添加调度注解即可。@EnableScheduling是在Spring 3.1之后可以使用。
如果需要开启并行执行,使用异步注解。在启动类上加入@EnableAsync。
package com.xiaocai.web;

import org.springframework.boot.SpringApplication;
import org.springframework.boot.autoconfigure.SpringBootApplication;
import org.springframework.scheduling.annotation.EnableScheduling;
import org.springframework.transaction.annotation.EnableTransactionManagement;

@SpringBootApplication
@EnableAsync
@EnableScheduling
public class TimeTaskApplication {

    public static void main(String[] args) {
        SpringApplication.run(TimeTaskApplication.class, args);
    }

}
示例:
package com.xiaocai.web.job;
@Component
public class UserTask {

    //@Scheduled(cron = "0 0/5 * * * ?")
    //@Scheduled(fixedDelayString="3000")
    @Scheduled(fixedRate=2000)
    public void doUserHandle(){
        System.out.println(" --- "+LocalDateTime.now()+"-- task for Annotation ");
    }
}
执行结果:
 --- 2020-06-25T16:08:18.455-- task for Annotation
 --- 2020-06-25T16:08:20.458-- task for Annotation
 --- 2020-06-25T16:08:22.460-- task for Annotation
 --- 2020-06-25T16:08:24.463-- task for Annotation
--- 2020-06-25T16:08:26.455-- task for Annotation 注解中,除了@Scheduled(fixedRate=2000)和@Scheduled(cron = "0 0/5 * * * ?")还有fixedRateString、fixedDelay、fixedDelayString、initialDelay、initialDelayString等可以自行尝试。
适用场景
与XML使用类似,把XML变成了注解。可以配合spring异步注解,实现任务线程的并行。
3、Java方式
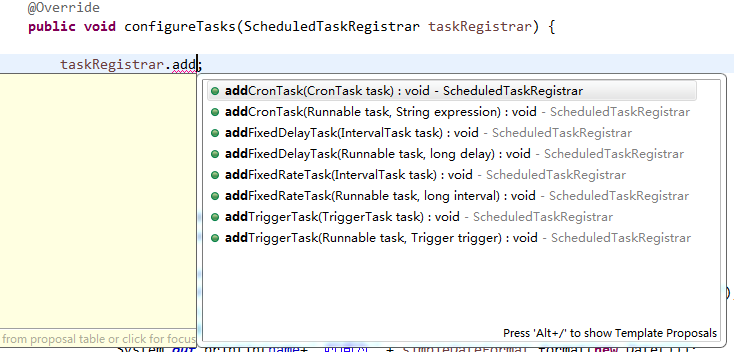
使用java方法可以实现SchedulingConfigurer接口的configureTasks方法。利用调度任务注册器ScheduledTaskRegistrar来注册需要执行的任务。添加任务的方式有:
示例:
业务执行类:
package com.xiaocai.job;

import java.time.LocalDateTime;

public class BuzTask implements Runnable {
    //当前业务执行参数
    private String jobData = "";

    public BuzTask() {}
    public BuzTask(String jobData) {
         this.jobData = jobData;
    }

    @Override
    public void run() {
        try {
            System.out.println(" jobData : " +jobData);
           System.out.println(" execute buzz code ..." + LocalDateTime.now());
        }catch (Exception e) {
        }
    }

    public String getJobData() {
        return jobData;
    }
    public void setJobData(String jobData) {
        this.jobData = jobData;
    }

}
自定义的调度管理类:
package com.xiaocai.job;

import java.util.Date;

import org.springframework.scheduling.Trigger;
import org.springframework.scheduling.TriggerContext;
import org.springframework.scheduling.annotation.SchedulingConfigurer;
import org.springframework.scheduling.config.ScheduledTaskRegistrar;
import org.springframework.scheduling.support.CronTrigger;
import org.springframework.stereotype.Component;

@Component
public class SomeTaskUtil implements SchedulingConfigurer{

    //这些参数也可以使用单独的JavaBean,或保存在数据库
    private  String cron ="0/10 * * * * ?";
    private String taskName = "Schedule_";
    private String jobData = ""; //公共执行参数
    private BuzTask buzTask;
    @Override
    public void configureTasks(ScheduledTaskRegistrar taskRegistrar) {
        buzTask = new BuzTask(jobData);
        //注册调度任务
        taskRegistrar.addTriggerTask(buzTask, getTrigger());
    }


   /**(也可以像任务执行类一样写在外面)
    * 业务触发器
    * @return
    */
   private Trigger getTrigger() {
       return new Trigger() {
           @Override
           public Date nextExecutionTime(TriggerContext triggerContext) {
               // 触发器
               CronTrigger trigger = new CronTrigger(cron);
               return trigger.nextExecutionTime(triggerContext);
           }
       };
   }
    //getter setter
}
Controller类:
package com.xiaocai.job;

import org.springframework.beans.factory.annotation.Autowired;
import org.springframework.stereotype.Controller;
import org.springframework.web.bind.annotation.RequestMapping;

@Controller
public class TaskController {

    @Autowired
    private SomeTaskUtil someTaskUtil ;

    @RequestMapping("/timeTask")
    public String timeTask(HttpServletRequest request){
        //这里跳测试页面,页面就三个文本框用来传,taskName ,cron,jobData
        return "timeTask";
    }

    @RequestMapping("/timeTask/changeCron")
    public Map<String,Object> changeCron(String taskName,String cron,String jobData){
        System.out.println(" taskName "+taskName);
        System.out.println(" cron "+taskName);
        System.out.println(" jobData " + taskName);
        someTaskUtil.setTaskName(taskName);
        someTaskUtil.setCron(cron);
        someTaskUtil.getBuzTask().setJobData(jobData);
        Map<String,Object> map = new HashMap<String,Object>();
        map.put("result","change success");
        return map;
    }
简单的HTML页面 timeTask.html:
<!DOCTYPE HTML>
<html xmlns:th="http://www.thymeleaf.org">
<head>
    <title>修改定时参数</title>
    <meta http-equiv="Content-Type" content="text/html; charset=UTF-8" />
    <script src="https://code.jquery.com/jquery-3.1.1.min.js"></script>
    <script type="text/javascript" src="../static/js/jquery-3.2.1.min.js"></script>
    <link rel="stylesheet" href="bootstrap3.3.7/css/bootstrap.min.css"
          type="text/css"/>
    <script type="text/javascript">
        $(function() {
        })
    </script>
<body>
<div class="panel-body">
    <form th:action="@{'/timeTask/changeCron'}" method="post" >
        <div class="form-group form-inline">
            <label for="txttaskName" class="col-md-3 control-label"
                   style="text-align: right;">任务名称</label>
            <div class="col-md-9">
                <input type="text" class="col-md-9 form-control" id="taskName" name="taskName"
                       placeholder="请输入任务名称"
                       required="required" />
            </div>
        </div>
        <div class="form-group form-inline" style="padding-top:45px">
            <label for="txtcron" class="col-sm-3 control-label"
                   style="text-align: right;">定时表达式</label>
            <div class="col-md-9">
                <input type="text" class="col-sm-9 form-control" id="cron" name="cron"
                       placeholder="请输入定时表达式"  />
            </div>
        </div>
        <div class="form-group form-inline" style="padding-top:45px">
            <label for="txtjobData" class="col-sm-3 control-label"
                   style="text-align: right;">任务参数</label>
            <div class="col-md-9">
                <input type="text" class="col-sm-9 form-control" id="jobData" name="jobData"
                       placeholder="请输入任务参数"  />
            </div>
        </div>
        <div class="form-group">
            <div class="col-md-offset-3 col-md-5">
                <button class="btn btn-primary btn-block" type="submit" name="action"
                        value="login">执行</button>
            </div>
        </div>
    </form>
</div>在浏览器输入:http://localhost:8080/timeTask
输入参数:
taskName :jobName1
cron :0/20 * * * * ?
jobData :123
页面返回了 {“result”:”change success”}
执行结果:
 jobData :
 execute buzz code ...2020-06-25T11:32:50.007
 jobData :
 execute buzz code ...2020-06-25T11:33:00.001
 jobData :
 execute buzz code ...2020-06-25T11:33:10.002
 jobData :
 execute buzz code ...2020-06-25T11:33:20.001
 jobData :
 execute buzz code ...2020-06-25T11:33:30.002
 taskName :jobName1
 cron :0/20 * * * * ?
 jobData :123
 jobData :
 execute buzz code ...2020-06-25T11:33:40
 jobData :123
 execute buzz code ...2020-06-25T11:34:00.002
 jobData :123
 execute buzz code ...2020-06-25T11:34:20.001
 jobData :123
 execute buzz code ...2020-06-26T11:34:40.001
原来设置的执行频次是10秒执行一次,jobData是空字符串。
页面操作之后执行频次是20秒执行一次,jobData值是123。
由此可见,java方法定时的好处,可以动态修改定时任务执行参数。参数可以从数据库拿,也可以在页面及时输入,总之比较灵活。应该适合大多数场景。
本文整理参考以下前辈链接,放个链接,以示感谢:


